Sunday, January 27, 2013

How to take good quality Macro photographs


Hello friends, I am back on the photography techniques. As I have mentioned in my last post we shall now begin discussing about the different types or techniques one can use to capture eye catching photographs.

As we see variety of things like flowers, insects, mountains, buildings, people etc. around us, known as 'Objects' in photography, in various surrounding, situations or environment which is identified in terms of 'Frame' in photography. The framing is what I believe is inherent and only can be improved by practice. So keep on clicking around with different frames in mind and just play around with your camera to identify the best frame you captured by reviewing your photos by self, friends and if possible by a professional photographer.

Alright, enough on the framing for now, let's see what are the different techniques we can use and which are useful for different types of photos. To begin with I shall take my personal favorite, the Macro photography. Remember every photography technique is useful for certain type of photos. So it goes true with Macro photography as well. Macro photography is useful to capture tiny details about smaller objects like flowers, insects, tree leaves and also to frame a small portion of bigger objects e.g. a human eye, texture on an apple etc.

In order to take a good macro picture we need to follow certain rules,

  1. What to shoot?
  2. How you want to frame it?
  3. Check on the light.
  4. Identify a good angle.
  5. Put your camera on macro mode.
  6. Target the frame. Remember the rule of third.
  7. Try to get as close to your object as possible.
  8. Zoom in on your object.
  9. Avoid using flash.
  10. Review the picture.
  11. Take multiple pictures and choose best among them all.

What to shoot?
Identify the object you want to shoot. What you want to expose, capture or highlight in that object. Be sure about it and concentrate your mind on it. Many a times you need to follow your object (like insect, animal etc. moving objects) in order to get what you want.

How you want to frame it?

Be specific on how you want to capture that object. (Remember the discussion we had on the shooting angle?) e.g. Taking a macro picture of a flower be sure whether you want to shoot the petals in detail or the stigma or an insect sitting on the flower.

Check on the light -
Is your object is properly lit up? Poor light conditions lead to addition of colour noise in the picture.

Identify a good angle -
to capture the frame. e.g. If your objective is shooting the patterns in the petal, shooting the flower from lower angle against an open sky when the sunlight is directly falling onto the petal, will lead to great results.

Put your camera on macro mode -
For automatic/semi-automatic cameras it is easy to change the mode and rest all settings will be changed automatically to suit the macro photography but for manual cameras (SLR) one need to check on the shutter speed, aperture, ISO settings manually. Also for the Manual SLR cameras there is enormous range of macro lenses available in market.

Target the frame. Remember the rule of third -
Check the object from your camera's eye piece. If the frame does not match your expectations make required corrections like change angle, position or zoom in-out etc.

Try to get as close to your object as possible -

It depends on how much your camera can focus on close objects and also how much the object allows you to get closer ;)

Zoom in on your object -
Zoom to the extent your camera is allowing. The zooming capability depends upon the distance of the camera lens from the object, light conditions and also the background (other objects in the background sometimes may distract camera from the object to shoot) Lock the focus, let the camera to focus and click.

Avoid using flash -
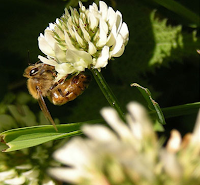
Do not use flash in macro photography as much as possible. In macro photography flash is useless as your object is so close to your camera (as close as 1 feet or even lesser (SLR with macro lenses)) The flash of any camera is useful if the object is at a distance 2 feet and more. In case of macro photography as the camera is closer than this range the flash will not light up the object properly, the flash will light the area somewhere near the object and you will land up with bad shades in the picture. Leading to a big disappointment.
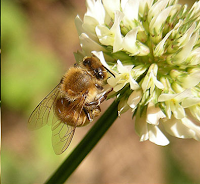
For an instance the above photo has been taken from a very close distance from the bee. The distance being to close the camera's built-in flash cannot light up the object properly but it appears to be coming from right side of the object. This leads to overexposed right top corner and underexposed left corners. The left side of the bee in this case is also not properly visible as it's left legs and body part is under the dark shadow.

But sometimes the flash can be used cleverly to light up underexposed portion of your object. e.g.
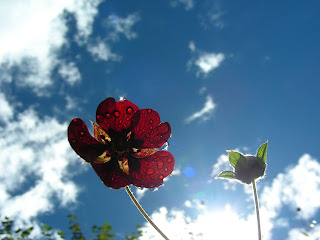
Flower without flash

In above photo the flower has been shot from below underexposing the face of it due to the Sun on its back. 

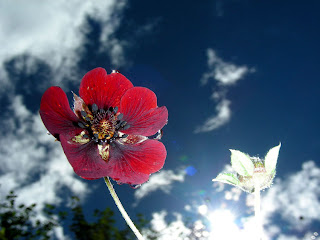
In this case I used camera flash to light it up properly. This caused me small side effects of loosing the details of the flower bud on the right side due to overexposure, but as its not my main object I absorb the loss against the details I could gain in the main flower.
Flower with flash

Review the picture -
Finally review the picture taken and try to improvise by taking another picture from different distance, angle etc.

Take multiple pictures and choose best among them all later-
From practice you will learn it is always a good idea to take a picture from a considerable distance and zooming on your object then in subsequent pictures try to go close to it. Especially when you are shooting for any insect or animal. Usually in the process of getting close; the object will fly away and you will be disappointed for missing a good click.


Apart from above mentioned list there is one important thing you need to have for macro photography which I have learned from personal experience is "PATIENCE" Keep waiting till you get the object in your range. This wait may last from few minutes to hours depending on what is your object and frame.

So next time you are out on a hunt and decide to take some macro shots keep the discussion in mind and you will come home happily smiling with handful of cherishing pictures.

Sunday, August 5, 2012

So far I tried to cover topics like, What's the difference between film and digital photography and camera, how to select a good camera which suits your needs and what you mean by photography, which are essential basics we need to know to start clicking around with the camera.

Now I think it's time to begin with the minute details about different types of photography like, outdoor photography, macro photography, indoor photography, model or object photography, night portrait, firework photography etc. Also, the techniques that one would love to tweak and find awesome results in the captured frames.

  This all and more in my upcoming posts, until then......

Monday, July 30, 2012

What do you mean by photography?

Hey, guys! Once you have a camera in hand, the obvious thing is to start shooting. Right? It is general that you purchase a good camera and are really high on shooting at various sites like mountains, beach, sunsets, party or even sport or general objects. When you shoot at multiple locations and come back to your room and load the pics on PC, suddenly you notice they are not matching your expectations. Worried about what went wrong? Whether the camera was faulty? Can't guess, right?

Here is the answer, most probably there is nothing wrong with the camera. Instead you are the one who made mistakes taking the photos. Quite hard to digest? But it's true. Most of the times people purchase a camera out of a craze. They really are unsure about what they are shooting while clicking. Once you are confirmed about the reason or object you are shooting, you won't be making mistakes normally.

There are few points to consider which gives basic idea about beginning to shoot.


  • What do you mean or see in a photograph?
A photograph basically reflect the point of view of the person behind the camera i.e. you. Anyone can learn how to click but no one can teach you what to click! There you have to rely on your own artistic view. A person can click a tree in more effective way than other. It is not the camera which makes the picture appears better but the imagination of the photographer (commonly addressed as point of view in photography world). Remember photography is basically an ART and you can enhance it using technology.
So when you take any picture first be assured what you want to capture. Identify your subject or frame and think about how you can highlight it. For beginners or when you are not sure try to take pictures from different angles and different frames, zooming in to highlight the object, zooming out to give feel about the surrounding. Or change angles to show different backgrounds etc. You can try low angles or take photo from height to make it look totally different.
Low Angle
Low angle shot
Close-up
Close-up

High Angle
High angle shot

  • Keep your subject/object as center of attraction
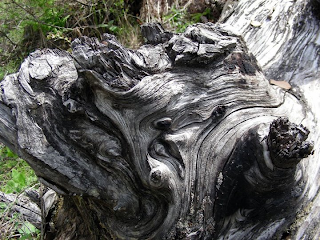
Once you made up your mind on what to be shot. Zero in on it! There are various ways to highlight your subject in the photograph. Decide if you want the subject to cover maximum part of the photograph, or be a part in the picture. The photos taken to detail the subject usually show the object covering all or maximum portion of the frame (usually picture of wood, flower etc taken to show details about the pattern or layers) .
Pattern of wood covering maximum frame area

or the photo should frame the subject as a part in the picture. Here, we apply the Rule of third.The rule states that the subject should be caught in one of the four quadrants of the frame.
Rule of third (Bee (object) is caught in the top left quadrant)

Sometimes it is advisable to break the rule of third (with a creative vision of course) and frame the object in diagonal way to highlight it against the background.
A stick captured diagonally against the snow-clad  mountain
adding a different POV to otherwise an ordinary snow landscape.

  • Using different techniques to shoot.
There are several techniques you can try while shooting a specific frame. Like using a tripod to make your camera more stable, turning flash on/off for specific types of photos (you need flash for shooting in low light conditions and avoid flash when shooting on macro mode.)

Try out low/high angle for making the photo look different. Low angle photos will highlight the subject and will make it look prominent and taller than in real. Whereas high angles make it appear smaller and more grounded.

Zoom can be used to highlight the subject by letting it take more space in the captured frame.

Make use of different lighting situations to add effects in the photo. Soft lights are more useful in model photography, to shoot objects like apple, table, stairs etc. Hard light are useful for shooting in black and white mode to allow better contrast. It is typically used while shooting moods in the picture captured. Natural lights are good to shoot landscapes. Try taking landscape photos in morning, the soft sunlight and cold of morning makes the landscape look mystic where the clouds are low and the sun rays are shining through the clouds making their way towards earth. The evening lights add sadness or loneliness in the photo. You can use it to shoot a lonely or remote hut, or lonely boat in the sea etc.

Depending upon the lights available for shooting decide whether to use flash or not. Remember flash is useless when you shoot from a distance more than 15 feet or so. So turn it off in that case cause its the most costlier feature in terms of battery power consumption. Also many a times adding flash may over burn your image, particularly taking macro pictures or close ups. For instance when zooming in on somebody's face added flash may make his face look white or over lit.

Check your position of shooting. When shooting from opposite to any light source, your subject will appear darker or even black.

Always remember you are smarter than your camera.... ;)

Friday, February 5, 2010

Know your camera well

Know your camera well before started shooting using it.


You have purchased a camera now, happily you open the packing and take the camera out and try to click around. It's a common mistake people does. You see every company gives a USER MANUAL with their products, have you ever seen it before or even after using your new camera?

As we have seen already that every model is different from rest by addition or removal of features. As well there are many adjustment done in already available settings with every new release of product. Have you ever seen the version of your camera software? What does that suggest? Though you already had a camera and handling it with comfort this new camera is different and needs your attention in knowing it well before actual use.

If you go through the user manual many of your confusions and misconceptions will get cleared and you can take better pictures with your camera. As well reading the manual will let you know the exact conditions and use of your camera. This will definitely reduce the maintenance of your camera.


What are the things you should look in the user manual: 
  • Different buttons provided on your camera and their use: There are so many buttons on the body of camera eg. On/Off, zoom in/out, mode selection, menu button etc. Every button has some functionality associated to it and there are several consequences. For instance, if you zoom in on an object the monitor will show a zoom range. There are two colors shown in the range box white and yellow.  "W" section is for optical zoom and "T" is for digital. Once you enter digital zoom monitor will show it in digital section and this will cause your image distort digitally.
  • The manual will educate you with all of the functions provided in your camera and their usage. Generally auto and semi-auto cameras come with so many preset modes like sunset, beach, landscape, fireworks etc. Understand these modes and remember when you set these modes on camera overwrite manual settings for exposure, WB, flash and uses its own calculated settings.
  • Most importantly your manual tells about right usage of battery, recharge and memory card insertion etc. These things need to be handled carefully, they will directly affect the life and maintenance of your camera.
  • Check out the places for various settings like WB measurement, exposure setting, self timer. It will help you in making faster adjustment at times.
  • There are so many settings with flash as well like red eye reduction, flash on, flash off, auto flash etc. These settings changes the way flash fills the frame. Use it specifically as the flash is the most battery consumable element in photography. If you use flash unnecessary it will require you to charge your batteries earlier than expected.
  • There is another element which draws your batteries power quickly and it is the monitor. Many people neglect the monitor turned on when they are setting up for photo or when just looking around for a frame. Better you turn it off when not required and turn on just before taking the photo (point and shoot cameras doesn't allow separate monitor off button, there you need to switch off the camera). You can set the monitor to turn off automatically after certain time interval eg. 30 sec, 1 minute etc. This feature will surely help you taking more pictures in same battery life.
  • You can find good information about the photo transfer from camera to PC or view them on TV using cables provided along with. You need to select appropriate  medium of connection in your camera and then connect it to PC. There are two ways to connect and transfer your photos from camera to PC
    1. Connect as "Mass Storage" Which allows you to connect to your PC through USB slot and copy paste the image folder or files on desired location in the PC.
    2. Through interface provided by manufacturer. It typically allows several features right from simple transfer to burn the pictures to form image disks.
    3. It is more convenient to set your camera on Mass Storage mode as it won't require to install the interface software on every PC you connect your camera to. And even it is like simple file transfer from one directory to other.
  • There is information about the firmware your camera is using and in case you need to confirm it for compatibility with your PC etc. Though almost all firmwares are supported by available PC motherboards.
  • Manual also tells many does and don'ts about the camera. Grasp it correctly and use cameras properly to properly utilize your investments.
  • You also need to clean your camera frequently or after using it in typical conditions like dust, seashores (check for any sand particle), Clean your camera with a clean cotton cloth. You can use a wet cloth or even use petroleum base liquids like petrol or kerosene which is a good solvent for carbon or dust.
  • Also during shoots its good to check and clean the lenses. Many a times it is covered with small dust particles or thumb prints which spoils your end picture.
  • Remember to keep your camera properly in restored position and if there is any cap provided for the lenses put it on. It will preserve the lenses from any scratches or dust particles during restore.

The concluding thing here to remember is know the features in your camera and get used to them so you can take nice and attractive picture using your camera.

Next time we shall see  how to take good pictures. Till then keep clicking.....

Thursday, February 4, 2010

Which camera to choose?

Which camera to choose?

In my last post we discussed about what is digital photography and how it differs from traditional film photography. Now we shall focus on which camera you can select to purchase and won't get disappointed for your choice later.

These days there are so many options for digital cameras available in market. They are of various brands like Nikon, Olympus, Sony, Panasonic, Cannon etc. Also each brand provides various models like Nikon provides S-series, L-series; Panasonic comes in Lumix DMC series, Olympus avails E-series, stylus series etc. All the models these brands provide keep on changing time to time. Each brand emerge with new advance models each year.

Typically when you go to buy a camera in market you have heard about certain model from your friends as how good it is and how beautiful snaps he could take from it. And you get impress with it and purchase same model investing few thousand bucks. But when you start shooting with the model you somewhere feel not satisfied with the pictures it produced and you get disappointed with your choice of camera. Actually the camera your friend suggested was good for his requirements and not yours. You may need something very different than your friend.

Here main thing you need to keep in mind is cameras are manufactured keeping certain specific shooting purposes in target. Like amateur photography or professional photography. There is huge difference in these two approaches. Considering these two aspects, cameras can be divided in main two categories; TLRs (Automatic, Semi-automatic cameras) and SLRs.

First thing to understand is what is the meaning of automatic in the context of cameras. As you may have heard people talking about White-Balance (WB), Aperture, Point-Of-View (POV), shutter speed or f-stop etc. All these terms are nothing but the setting you can make in a camera to suit the photography needs. Now if these settings are handled by your camera on its own without your interference then you have an automatic camera. If few of these setting can be managed by you then you own a semi-automatic camera and if you can fully control these settings without having the camera override them on its own calculations then you have a manual camera.

Generally all cameras available in market are semi-automatic where you can manage the settings for WB, Exposure or flash etc. and shutter speed, aperture etc. are managed by the camera on its own by calculating the lighting conditions or presence of flash etc. Typically when we talk about SLR cameras, those cameras you can put on either settings i.e. manual or automatic.

When companies manufacture semi-automatic or manual cameras the costs are definitely going to be extremely different. If you go for a Nokia S-series camera it will cost you from 7-8 thousand rupees to 12-14 thousand rupees. Whereas if you opt for SLRs like D-80 or D-60 etc it will cost you upto 30 thousand rupees that to only the body and default lenses which is upto 10x optical lens. We shall see what is meant by optical lens in later post.

If we focus on semi-automatic cameras for now, then too you will surely be confused about which camera or model to choose? The answer is simple "purchase a camera to suit your needs."

First you need to identify your shooting needs. For this you can ask few questions to yourself...
  1. What exactly you mean by taking a snap or shooting a picture?
  2. Where you think you will be shooting the most, outside or inside?
  3. How many times in a year you generally need to take pictures?
  4. Finally the most important, how much money you wish to invest in a camera?

Taking above question in mind let's discuss on them and sort out the myths or misleading thoughts.

1. What exactly you mean by taking a snap or shooting a picture?
  • Generally most of the people want a camera to shoot at a family function like wedding/reception or on a trip. These guys don't wish to try on multiple modes of shooting and even don't see themselves shooting like a professional or wish to turn or take interest in professional photography. All they want is just clicking the camera button and capture the moment for later reviews. These people can go for a basic semi-automatic camera with minimum of the optical lens range like 3x or so. Which will cost them upto 7-8 thousand rupees only. Don't waste too many bucks for the features that you don't need at all like a manual mode or so.
2. Where you think you will be shooting the most, outside or inside?
  • Cameras need to have different settings for indoor and outdoor shooting. Generally these days all cameras provide different modes inbuilt in the camera for indoor and outdoor shooting. But if you think about taking pictures like a pro take for instance a beach photo shoot or event photo shoot like reception; it will require different and more advance accessories like external flash and extended lenses etc. So if you are not going to shoot like a pro as mentioned you need not to choose a camera which provides a facility to add and external flash or extended lenses. Which will again save a lot many bucks for you.
  • Shooting indoor won't require you to have a higher range of optical lens as you hardly need to zoom in inside a party hall or at reception. For this a 3x optical zoom is more than sufficient.
  • For outdoor shoots like on a trek or so, you may need to have higher range of optical zoom capability or need a wide angle lens to take a picture from a distance or take larger width picture than normal.
3. How many times in a year you generally need to take pictures?
  • Check the frequency of your shoots. Based on it you can think about your investment in camera. Many a times people decide to purchase a camera when they have some events like marriage, reception or while going out on a trip. They purchase a good camera investing hefty amount in it and once they are done with their event their camera stays restored for a year or so. Remember every instrument has a specific life after which it starts requesting for maintenance. So if you are wasting your camera's life on shelf you will be ending investing so much in the purchase and maintenance than you got repaid by actually using it.
4. How much money you wish to invest in camera?
  • Always keep your figure in mind when dealing with the vendor. Normally I have seen people decide to purchase a camera in the range of 7-10 thousand and when they visit a shop they come out purchasing one with 12-14 thousand or so. Remember the more the price of a camera the more features it provide. So when you are adding 2-4 thousand more on a camera check for the features it is adding and also see whether it is suiting to your shooting needs or not.

  • Typically the features adding extra bucks are...
  1. Optical lens capacity. Normally it is measured as 3x, 5x, 10x and so on. Where 'x' stands for 'times'. So when your camera has a 3x optical capacity, it means you can capture something thrice closer than normally it appears. So if you want a camera for general shooting purpose you might not need one with higher optical ranges.
  2. Megapixels. As discussed in previous post it signifies how big picture you can capture without affecting the quality. So if you are going to view your pictures on a PC screen you might be satisfied with 6-10 MP and not more than that.
  3. Number of features your camera provide.
  • Vibration Reduction (VR): This feature tries to reduce vibrations caused by shaking of hand while taking pictures. The previous models of Nikon were not VR embedded. The first camera introduced by Nikon with VR was Nikon Zoom 700VR QD in 1994.
  • AF Assistance: Auto-Focus assistance allows to focus properly on focus area in poor lighting conditions as well.
  • Auto face detection: Detects faces and focuses on them. This feature is helpful when taking group photos to get all the faces clearer.
  • Smile detection: This is a newly added feature. It releases the shutter when you smile.
  • Self timer: Delayed shutter release. You can mention the delay in seconds so that you can join the rest of the team in a group photo. This is helpful in lower ISO settings and poor light conditions, where you want to introduce blur due to shaking of your hands.
There are enormous number of features being provided by camera manufacturer. You need to select the required feature and find a camera which provide your required features and go for it instead wasting thousands of rupees in non required features.

Finally you really need to search the market for compatibility among your needs and available features in model. For that the best thing is to
  • Search and compare your model based on user reviews on internet. You can visit the manufacturers sites to get most reliable feature knowledge.
  • Visit the user reviews to get trusted reviews and finally search a place to purchase a camera.
  • Don't go for a remote or foreign retailer because if you are not willing to pay for company warranty or international warranty (which costs another 10 thousand rupees or so than the camera cost) you may need to visit the retailer personally with the camera in case of faulty piece or repair.

So choose wisely and go for a happy shooting.......

We have seen about how to choose a camera today, in the next post we shall think on various camera features in detail. Till then keep clicking......